Remote PC connection. It's very simple, three methods to choose from. Guide
The tool is available on all versions of Windows XP starting with Windows XP. At the same time, a computer running Windows 10 Home cannot work as a remote desktop server (connections cannot be made to it). Only the client of this service is present in this edition of the system.
How to enable Remote Desktop
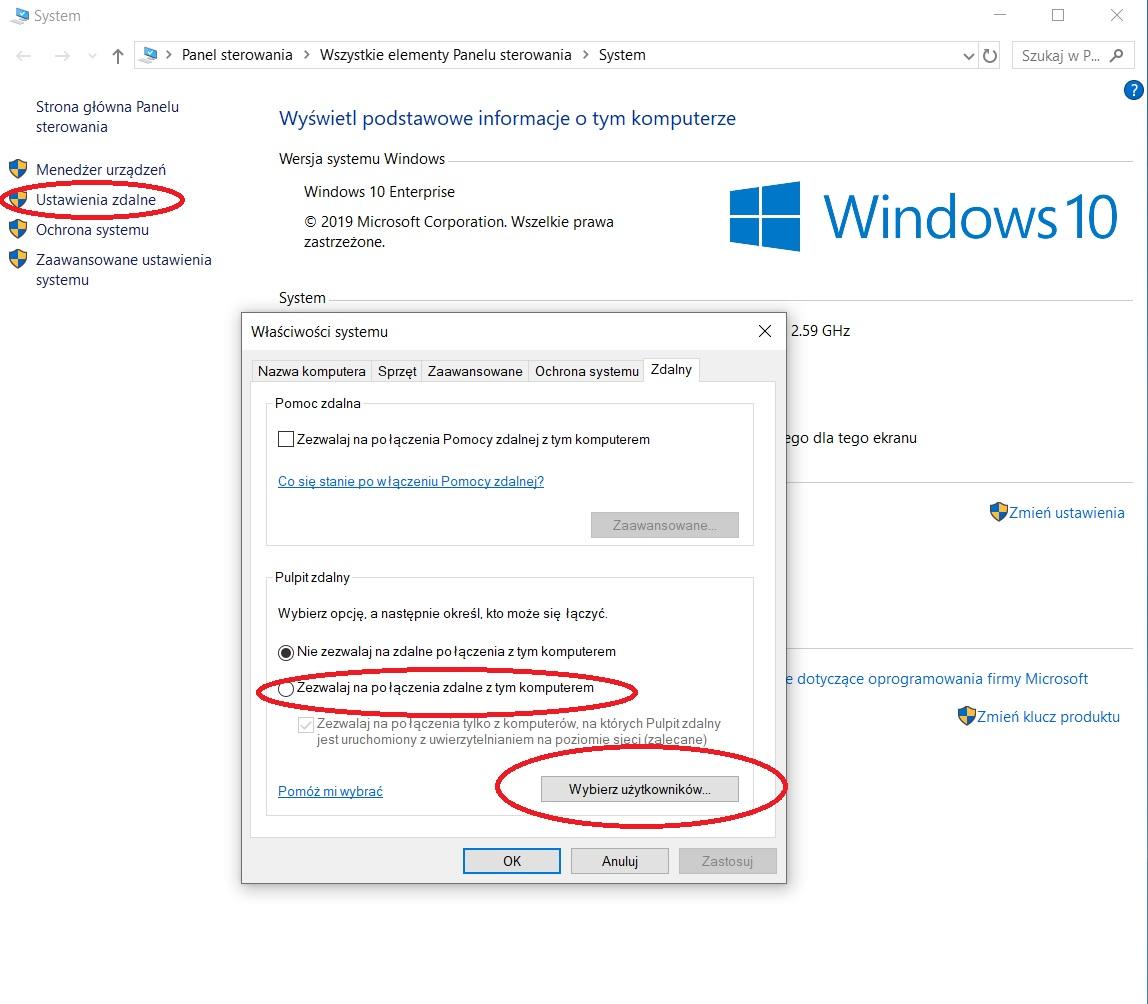
1. To enable remote desktop sessions, go to Remote Desktop Settings and enable the service. Then click Advanced Settings and uncheck Require computers to use Network Level Authentication to connect (recommended) by default. This option is important in corporate networks that use the 802.1x protocol to protect access. At home, in a small business, such solutions are not used. By default, the service uses port number 3389. You can change it, but this involves manually modifying the HKEY_LOCAL_MACHINE\System\CurrentControlSet\Control\Terminal Server\WinStations\RDP-Tcp hive in the system registry. Changing the default port is done in the case of sessions outside the local network (without VPN), when they are established with two or more computers - this is related to port forwarding that must be performed on the router.
2. The service has been enabled and the computer is waiting for a client connection.
3. We run the client by searching for it in the Start menu or by issuing the mstsc command. The utility window hasn't changed much since it first debuted in Windows XP. The most important options needed to establish a remote session are on the General tab. On the others, we will configure settings related to the screen, the use of local resources or optimization of performance.
4. To establish a connection with a computer, enter its IP address (we will check it on the router, in the Network Connection Status window or after issuing the ipconfig command in the command line).
5. This is enough to make the connection within the local network. The situation becomes more complicated when we establish a session from outside our local network via the Internet (from the WAN side).
6. To be able to establish a connection, it is necessary that the router (or host) has an external IP address, and this is getting harder and harder. In many cases, the router is assigned a private address, because this is how the service provider's (ISP) network is configured - the end user is then behind the so-called double NAT - behind the ISP router and his own. In many models of routers we will find information about the IP address of the WAN port and if we find there an address from the private pool covering the ones shown below:
We can forget about establishing a remote desktop connection (as well as about using a VPN server, DDNS or e.g. access to monitoring devices such as IP cameras, for which the port forwarding method is used).
7. When the router has an external IP address, all you need to do is find the Port forwarding setting and add a new rule (using the Asus device as an example):
8. After defining the rule, the remote connection to the computer should be successful.
Way to firewall - VNC Viewer
The presented scenario is an "optimistic" version, which often, despite the correct execution of all steps, does not end successfully. In 99% of cases, the firewall will be to blame. To find the culprit, you need to check not one, but three - the one operating on the server side, client side, but also the router side. Starting the Remote Desktop service should force the creation of appropriate rules on the firewall, thus allowing this type of network traffic. While in the case of a system firewall we are sure that this will happen, there is no such certainty when using third-party solutions. Therefore, the easiest way to diagnose is to disable all security and try again, which should be successful this time. We will identify the culprit when the connection fails after turning on the firewall. Adding a rule to open the port should finally do the trick.
How should a user whose computer is running Windows 10 Home cope? Use the free VNC Viewer for the client and VNC Server for the computer you're connecting to. A free Home (non-commercial) license is available for connectivity to up to five hosts. The principle of operation of the program is identical to the remote desktop service. The advantage of the application is its multi-platform nature, as it works in many environments. Privately used by me to connect to the RaspberryPI, which is connected to the TV and update the content displayed on it.
1. The VNC server communicates with clients over port number 5900.
2. Having an external IP address, we can try to run another service that will give access not to a single computer, but to our entire LAN network. And thus to all devices in it. This mechanism is called VPN (Virtual Private Network) - a virtual private network.
3. We run the VPN server on the router (because it is the gateway to our local network). This function should be present regardless of the model of your router and it is very rare that the device does not support it (it is worse in the opposite situation, when we want to reverse the situation and we are the customer). Its absence may be caused by having an "aged" router, as well as a consequence of not updating its software (firmware).
4. The type of server (protocols used) depends on the capabilities of the router, but its simplest version, PPTP (Point to Point Tunneling Protocol), is always present. Configuration boils down to enabling it and defining a user account.
5. We perform further actions in the system from which we will establish the connection. In Windows, go to the VPN Settings tab and select Add VPN Connection. In the newly opened window, specify: connection name, IP address (external IP address of the router on the WAN side), type of VPN network (protocol used) and access data.
6. After configuring and saving the settings, you should be able to establish a connection - access to our LAN is open regardless of where we are.
7. Some device models allow you to define to which subnet (separate addressing) connected clients go. As a result, they are somehow separated from the basic network and are unable to communicate with devices located in it. When this happens, we need to change the address of the network used by VPN clients to match the address of the primary network.
8. The external IP address assigned to the device is not static and changes frequently. Changing it will make the connection fail. Fortunately, there is a solution for this too - the use of the DDNS (Dynamic Domain Name System) service. This mechanism will associate the IP address of the router with the domain name, and if it changes, it will update it. The association makes our device available all the time under a friendly domain defined by us. The service is present in all relatively new routers. What distinguishes the devices is the entity implementing it. It is most convenient for us when the manufacturer of the router provides such a service, but if this does not happen, the router on the card configuring the mechanism will tell you what services it cooperates with (usually DynDNS or NO-IP). After creating an account on a given website, enter the data (login and password) in the router settings. When everything is done correctly, the router will be reachable via the domain name.

9. Now all you need to do is update the address field (the IP address is replaced with lukasz000.asuscomm.com in the example below) of the VPN connection created in the previous step.
10. We have configured everything correctly, the connection is successful.
11. The domain name configured in this way can also be used within established remote desktop sessions.
We use a VPN server
It is more secure to use an OpenVPN server. OpenVPN is a solution that allows you to establish VPN sessions. It is not available by default on any system, but the tool can be installed on virtually any system: from Windows XP, macOS, Solaris, FreeBSD to all Linux distributions. For mobile devices, the necessary packages are available for both iOS and Android. OpenVPN support can also be embedded in the router software.
1. To configure a VPN server using the OpenVPN mechanism, go to the service configuration tab, enable it, define clients and generate a service configuration file (which should be provided to the client).
2. To connect, you need to download the OpenVPN client (openvpn.net).
3. After installation, the application icon can be found in the system tray. The connection is configured after selecting Import file…
4. Importing the file will allow you to connect. We choose Connect.
5. Entering the correct login data completes the connection setup.
6. Establishing a connection is signaled by an appropriate message.
7. Of course, in order for the connection to a given device to take place, it must be turned on. What if the remote computer is turned off? The situation is not hopeless and there is advice for that as well. In order to remotely turn on the computer, our network card must support the WoL (Wake on LAN) function. The technology allows you to remotely turn on a computer connected to the network by sending a special data packet, the so-called Magic Packet - first 6 bytes filled with 1s (FF:FF:FF:FF:FF:FF), then repeated sixteen times the computer's MAC. By sending it, we provide the MAC address of the enabled device.
8. For the mechanism to work, the function must be activated in the computer's BIOS/UEFI (usually it is disabled by default) - look for the Wake on LAN option (or a similar name, it is worth using the manual at this stage).
9. The next step is to enable it in the network card driver. Go to the Properties tab of the network adapter and in the Power Management tab, check the box Allow this device to wake the computer.
10. In the second step, go to the Advanced tab and in the Properties field, find the position where the name of magic packet, WOL, or WakeOnLAN appears (there is no fixed name) and set the value to Enabled.
11. After completing all the steps, you should be able to turn on the computer via the network. For this purpose, we can use, for example, the WakeMeOnLan tool by Nirsoft.
12. The wake-up tool can also be found in the Asus router software, just select Network Tools from the menu on the left, and then go to the Wake on LAN tab.
Whatever method you choose, for it to be successful, you must use the MAC address of the network card of the computer being woken up.
Remote desktop in Google Chrome - it couldn't be easier
The methods of establishing remote connections presented so far required a bit of "work", we are aware that not all our readers are so proficient in IT matters to easily deal with the configuration presented so far. Therefore, for all such people, the use of the Chrome Remote Desktop tool will be a godsend. Its installation is a rescue when we cannot deal with a fault and we have a friendly IT specialist who is able to help us remotely.
1. In the first step, we go to the website and choose whether we want to access the computer or share our screen. In both cases, you need a Google account. Since we need help, we select the Share my screen button. The extension is installed.
2. To finalize the connection, it is necessary to generate a 12-digit code, click on the Generate code button, which should be provided to the calling party.
3. In the Connecting to another computer section, enter the received code and then select the Connect button.
4. After accepting the connection, the remote session will be established.
5. The person initiating the connection can control our machine.
6. The whole thing is extremely simple to do and should not cause any problems.
7. Of course, the presented methods are not the only ones, before buying a given device, it is worth checking (when we plan to establish remote connections) how it must be configured to be able to use it outside the LAN. Many manufacturers offer solutions that provide remote access via their own cloud, e.g. a TP-Link router can be controlled using a dedicated application from anywhere in the world, as well as accessing files stored on a Qnap NAS server. From the customer's point of view, such solutions are the easiest to configure, because the only thing to do is to set up an account in a given service and link it to the device.


