Renovation of wooden windows - step by step | We are building a house
Renovation of wooden windows - step 1. Window condition assessment
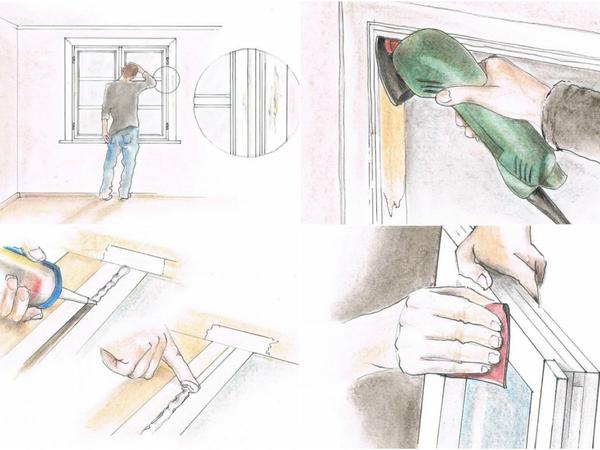
Window condition assessmentThe scope of renovation works depends on the technical condition of the window.
So we check in turn:
Renovation of wooden windows - step 2. Dismantling of sashes
Dismantling the wingsBefore starting the renovation of the window, it is usually necessary to remove the sashes from the hinges. In frame and casement windows, it is enough to lift the open sash and remove it from the hinges. In combined models with a tilt-and-turn sash, you will have to unclip the tilt limiter (on the upper edge) and - depending on the hardware version - punch out the hinge pin (tilt sash) or lift the sash on the bottom hinge pin (tilt and turn sash).
Screwed windows, the so-called Swedish, easier to disassemble after unscrewing both frames and removing the external stile from the internal hinges, then the internal one. In this way, the renovation can be broken down into stages and the sash with the inner frame closed.
Renovation of wooden windows - step 3. Fixing the fittings
Fixing the fittingsThe fastening of the sash hinges and other hardware elements weaken over time as a result of loosening of the screws, corrosion or local cracks and decay of the wood. In old windows, the problem may be tightening or replacing the fixing screws, when the cuts for the screwdriver are too shallow or corroded. If they cannot be "moved" in any way, you have to drill additional holes in the metal element and tighten it with new screws.
If the fastening is loose and the screws come out without much resistance, it will be necessary to pin the holes. For this purpose, you can use ready-made wooden furniture pins with a diameter of 8 or 10. After drilling the hole to the required depth, the dowel is hammered in and glued with a wikol-type glue, which will ensure good seating of the new screw.
Renovation of wooden windows - step 4. Correction of profiles
Correction of profilesWood defects and deformations in the frame or sash profile require repair by grinding the protrusions or profiling the defects. The most troublesome will be replacing the decayed wood, as you will need a router with a guide to cut out the damaged fragment. A new piece is glued in its place, adjusting it by grinding. Long, "humped" deformation of the profiles, after initial grinding, can be repaired by gluing veneer strips of the appropriate length to them. The shortest one is glued on the section of the largest recess, then successively longer and longer until the surface is even. Finally, the profile is sanded along its entire length.

The adherence of the leaf to the frame can be checked using pieces of plasticine. Glue its rollers to the notch in several places, cover it with a piece of foil, and after closing and opening the window, measure the thickness of the crushed mass - it should be similar around the perimeter. This thickness will allow the selection of the appropriate gasket profile.
Renovation of wooden windows - step 5. Renovation of glass seating
Renovation of glass seatingDepending on the age of the windows, the panes could be fixed with putty, plastic slats, silicone or a rubber gasket. You can only fix the putty and battens on your own, replacing them with putty. The other methods of mounting relate to insulating glass units and, as a rule, do not require correction. Old putty can chip or crack around its perimeter. Minor damage is best repaired with acrylic mass applied with a spatula. First, the old putty should be sanded (protecting the glass from scratching) and dusting thoroughly.
If it is necessary to apply a new seal, the old one must be removed completely - taking care that the pins supporting the glass (nails without heads) are not rusty and do not fall out. Knock the missing pins in by carefully guiding the hammer along the surface of the glass. Applying the glazing putty requires a bit of practice. After kneading (kneading) the putty and shaping the roller, press it evenly at the junction of the glass and the frame using a narrow spatula or a rounded knife. The veneer should have a triangular cross-section without a step at the junction with the glass. The glazing putty dries for a long time (up to 6 weeks) and only then can be painted.
Renovation of wooden windows - step 6. Preparation for painting
Preparation for paintingIf the renovation of the window is limited to the renewal of the paint coating, which adheres well to the substrate and does not require more serious repair - the preparation can be limited to rubbing the wooden surfaces with sandpaper grit 150-180 and, if necessary, filling point defects with acrylic. It is also worth removing visible fittings (handles, opening limiters), if they do not require renewal.
If old paint peels off, you will need to remove it completely. Usually, the outer surfaces are the most damaged, and the damage often extends to the wood structure. The old coating can be removed with special preparations that soften oil paints, and scrape with a spatula or by tanning. The most effective, however, will be a belt sander, first with a belt grain size 40-60, then 80-100. After sanding the wood and vacuuming it, you can fill any cavities and cracks with acrylic putty. Depending on the depth of the losses, the filling is carried out in several stages. After the initial leveling of the plane, we sand it with paper granulation 150-180 mm, most conveniently with an orbital sander.
Renovation of wooden windows - step 7. Impregnation
ImpregnationThe exposed raw wood, after repair and sanding, should be impregnated to protect it against rotting, UV radiation and to ensure good adhesion of the paint coating. For impregnation, deeply penetrating thinner preparations are used, even in the case of subsequent application of water-based paints. The impregnation is applied with a brush once or twice, depending on the absorption of the wood, in an even layer, without leaving any stains.
After the first layer is dry, the wood should be sanded to eliminate the roughness caused by the rising of the wood fibers, and before the last layer is dry - drag it with a dry brush.
Renovation of wooden windows - step 8. Renovation of seals
Renovation of sealsOld windows may or may not have damaged seals. In the past, factory-fitted rubber gaskets, surface-mounted with staples (old-type windows) or made of EPDM (newer versions of windows), were set in milled grooves. Surface seals lose their elasticity over a long period of time or come loose and must then be replaced. In newer windows, the seals are less prone to damage, but there are local tears or permanent deformations.
To improve the tightness, you can use the self-adhesive or pressed profile seals available in stores, with an appropriately selected profile. In windows with double frames (box, frame), self-adhesive profile seals are mounted in the notches of both sashes, and in screwed-on windows in place of the old, detached seal. It is also worth installing a seal between the twisted rails - the air layer between the panes will improve the thermal insulation of the entire window. Self-adhesive gaskets are attached after the windows are painted, the paint is completely dry and the surface dirt is washed off. They cannot be stretched when sticking.
Do you appreciate our advice? You can get the latest every Thursday!Renovation of wooden windows - step 9. Painting
Painting windowsThe repaired and sanded surfaces should be thoroughly vacuumed. Elements that are not going to be painted, i.e. hinges, fittings and glass next to the profiles, need to be covered with masking tape. It is troublesome to protect the seals if we do not replace them, but instead of sticking them with tape - it is better to cover them with a wide spatula during work, which is moved along the seal as the work progresses.
Water-based acrylic and solvent-based paints are suitable for painting windows. In both cases, the durability of the coating will be determined, in addition to the proper preparation of the substrate, the quality of the material used. Therefore, it is worth using more expensive professional paints, especially when renewing relatively new windows. When choosing a paint, we should also pay attention to the length of its drying period. Until the coating hardens, the windows cannot be closed, as the profiles or gaskets may stick together. Water-based paints are generally easier to apply and reduce the risk of the coating peeling. In addition, they ensure that the grain pattern is retained if they are applied to previously unpainted wood. Solvent-based paints create a tighter, high-gloss coating.
Flat brushes with soft bristles of at least two widths are used for the application of paints. Due to the complicated shape of the profiles - painting is carried out in stages, starting from the surface around the perimeter of the leaf and frame, and after they dry, we cover the front surfaces. Most often, two layers of paint are applied. Do not paint in strong sunlight and at high temperatures, because the paint may dry under the brush, making it difficult to spread.
Renovation of wooden windows - step 10. Adjustment of fittings
Hardware adjustmentIn old windows with single rails, there is practically no possibility of adjusting the fittings. Only the height of the hinged suspension can be changed by installing washers of the selected thickness on the pins. In the same way, the height of the hinged sashes in tiltable combined (screwed) windows is adjusted. They can also modify the position of the external sill itself, so that it does not rub against the window sill.
In tilt and turn sashes, the position of the sash in relation to the frame is also regulated. For this purpose, mounting rod guides are used, which can be screwed in or unscrewed from the sash frame. Sometimes it is necessary to move the lower striker of the hinge away from the frame, which will allow for easy insertion of the fastening bar.
Perimeter fittings, installed in newer types of windows, have much greater adjustment possibilities. Thanks to the eccentric elements, it is possible to change the position of the sash in every plane and set the pressure force. The method of adjustment depends on the hardware model, and a detailed description of the steps can be obtained from the manufacturer.
Renovation of wooden windows - step 11. Materials
Renovation of wooden windows - materials neededThe selection of materials for renovation is related to the planned scope of work and includes mainly painting products and seals. These will be paints, varnishes or enamels for wood, intended for use outside and inside, water-based or solvent-based. As well as wood putty, acrylic filler, solvents and washing preparations. Glazing putty and possibly headless nails will be needed to fix the glass panes.
When repairing fittings, you will need wood screws of appropriately selected diameters and lengths, as well as wooden dowels to fix damaged holes. A polyvinyl wood glue such as wikol will also be useful. Profile self-adhesive seals made of EPDM rubber or cheaper but not durable ones made of a sponge will be used to seal the window sashes.
Renovation of wooden windows - step 12. Tools
Renovation of wooden windows - tools neededIn addition to basic hand tools - such as a small hammer, spatulas of various widths, flat brushes, screwdrivers, a scraper, scissors or a knife with a replaceable blade - power tools with accessories will come in handy. Effective removal of paint and alignment of the surface of the profiles will be ensured by a belt grinder with belts with a grain size of 40-120.
For the final finish of the wood before painting, an orbital sander with a rectangular or triangular foot and sandpaper grit 120-180 will be useful. When repairing the fastening of fittings, you will need a drill with wood and metal drills, with diameters adapted to the dimensions of the fastened elements.
Editor: Cezary Jankowski


