Installation of external blinds on facade windows - step by step
Installation of external roller shutters on façade windows - step 1. Materials
Completion of materials basically comes down to choosing the type of cassette and its armor, control system and protection against opening.
You will need grommets and guides for the cable or tape as well as plugs for the guide and mounting holes. You will also need wall plugs (adapted to the wall material) or sheet metal screws or wood screws.
To mask the gap at the junction of the guides with the wall, we will use acrylic mass squeezed out of the tube.
To connect the drive, you will need a stranded cable with a cross-section of 3 × 1.5 mm2, an installation box, connectors, and sometimes a mini-switchgear with a switch and overcurrent protection.
Installation of external roller shutters on facade windows - step 2. Tools
The basic tool will be a drill with a set of metal drills and possibly a shank cutter.
When attaching the roller shutter to the facade, we will have to use a hammer drill or even a hammer drill with concrete drills, including one long one to drill through the entire thickness of the external wall. For measurements, we will use a rolled measure, to control the setting of the blind - a spirit level.
To immobilize (for the time of fixing) the cassette and the guide, you will need clamps. When mounting on the window frame, short varieties are enough, but for mounting on the wall, you will need to use longer ones, approx. 0.5 m. To tighten the screws and bolts, use screwdrivers with properly selected tips and flat or socket wrenches.
Installation of external roller shutters on façade windows - step 3. Selection of mounting method
It is best to consider mounting window roller shutters already at the stage of the building's shell, which will enable the construction of the lintel to be prepared in such a way as to hide the rolling cassette in it. In a used house, we can easily install the so-called adaptive roller shutters, mounted on the window frame or on the façade.
They are most often fixed in the light of the window opening, which guarantees stable fastening of the cassette and guides, and with a thick layer of insulation, the housing only slightly protrudes beyond the plane of the façade. Although the cassette slightly reduces the surface of the window, the limitation of the influx of light is not noticeable. The space on the glass is not taken up by the roller shutter placed on the external wall, but its installation is more difficult, e.g. when we want to embed it directly on the insulation layer.
When planning to install a roller blind, it is also worth considering equipping it with a roll-up mosquito net. It will provide invaluable protection against insects, especially in areas with an increased occurrence of annoying mosquitoes or other insects.
GuideDo you value our advice? You can receive the latest every Thursday!Installation of external roller shutters on facade windows - step 4. Necessary measurements
Depending on the planned method of attaching the roller shutter - to the frame in the window recess or on the facade - we need to carry out appropriate measurements. Assuming that the window reveal is finally finished, we determine its width and height. Due to possible irregularities of the sides of the opening, its smallest width should be measured by placing two rigid strips against the reveal. Less accurate will be spot measurements - directly applied measuring tape - because in the case of wavy edge finish, the blind guides may not fit there. We reduce the fixed width of the reveal by approx. 5 mm, which will allow for possible correction of their fastening, and the gap next to the wall will be later filled with acrylic mass.
When determining the height of the reveal, it is important not to specify too low a height, because too short a curtain of the roller blind will not cover the window completely, while longer guides can be shortened, and the excess of the roller blind will be wound on the shaft.
If we decide to mount the roller shutter on the facade, we must first of all examine the possibility of mounting the guides on the wall.
In a non-insulated (single-layer) wall, the pins fixing the guides should be placed at least 7-10 cm from the edge of the reveal - the external width of the attached guides and the cassette will then be 20-25 cm greater than the width of the window opening.
On walls insulated with the BSO method, roller blinds are rarely installed due to the uncertainty of their durability. In the case of wall insulation using the light dry method, roller blinds can potentially be hung on the façade after appropriate reinforcement of the reveal, but the functionality and aesthetics of such a solution raises a lot of doubts.
Installation of external roller shutters on façade windows - step 5. Openings for control cables
Installation of the cassette on the window frame is usually successful without going outside, but when installing it on second floor, you must ensure the protection of another person.
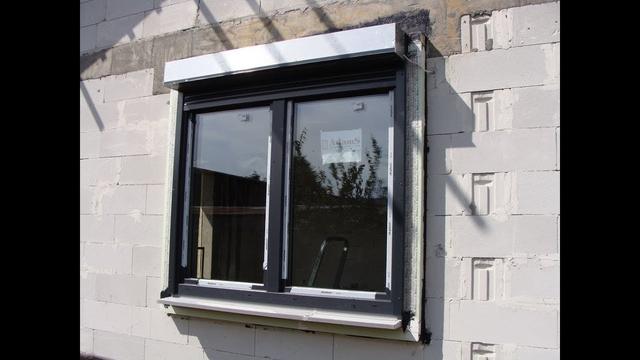
We start mounting the cassette by marking a place and drilling a hole to pass the power supply cables to the drive. In the case of manual control, we must adjust the location of the hole for pulling the cord or tape to the winding wheel on the cassette shaft. The point where the hole will be drilled will be determined after applying the cassette with the cover removed or measured on the window frame from the corner of the jamb (transferring the distance of the cutout in the cassette).
Already when ordering a roller blind, we should specify the side on which the roller will be located - usually from the side of the handle or fixed glazing (fix), and in double-leaf windows from the side of the hinges of the less frequently opened part. In the event of a collision of the retractor with other elements around the window, it is possible to change the side of its mounting, but this requires disassembly of the cassette. When mounting the roller shutter on the façade, it may be difficult to prepare a hole for the tape or winding cord due to the reinforcement of the lintel.
Of course, a hammer drill will be necessary to make a hole in concrete, because a hammer drill - especially a hole with a large diameter - is not easy to make.
It's easier with electric roller shutter control. We make them in any place, e.g. diagonally in the wall reveal, but we need to determine the route of the wire and the connection point to the electrical system inside the house.
Installation of external roller shutters on facade windows - step 6. Installation of the cassette on the window frame
The roller shutter cassette - after removing the front cover - is placed at the top of the window opening and check its horizontal position. Carpenter's clamps will be useful for this, they will stabilize the correct position and facilitate permanent attachment. Note the alignment of the cable/tape hole with the notch in the cassette housing. In the event of discrepancies, the hole in the sheet can be enlarged to a certain extent to allow the insertion of a tube or a flexible grommet.
Attach the cassette to the frame with sheet metal screws or wood screws, after making holes in the rear wall and guiding holes in the window frame (of smaller diameter). The extreme fixing points should be placed at a distance of 5 cm from the ends of the cassette, and the remaining ones at approx. 50 cm intervals.
The cassettes of long roller blinds are more convenient to install together with inserted guides, which will serve as supports when determining the location of characteristic points.
Assembly of external roller shutters on the facade windows - step 7. Mounting the cassette on the facade
When mounting the roller shutter on the facade, we must use a platform, scaffolding or a lift.
It will be convenient to use pegs for the so-called quick assembly, as they can be directed directly through the holes in the cassette. Just pre-install it on one hole, level it and drill the hole in the other.
An already hanging cassette can be additionally screwed in the required spacing of fixing points. However, quick-assembly dowels are not suitable for aerated concrete and porous hollow bricks - on such walls, use dowels intended for them.
Assembly of external roller shutters on the façade windows - step 8. Fixing the guides
The curtain guides are attached with screws. Most often, they have drilled holes at the desired distance and it is enough to adjust their length to the window opening (if necessary, cut them with a hacksaw), insert end caps into the lower ends and embed the guides in the cassette catches.
If there are no holes in them, we have to drill them ourselves. We place them in the outer part of the guide profile (in the middle of the closed section), which corresponds to approximately ¼ of its width. Their diameter will be different - in the front wall they should allow the screw head to pass through and match the size of the end caps supplied with the roller shutter (usually 10 mm), and from the base side they should fit under the screw (usually 4-4.5 mm). Of course, first we drill the holes with a thinner drill bit, then we enlarge it in the front wall.
Equal edges of the hole are difficult to obtain using a regular metal drill, so it is better to make a smaller hole, then widen it, e.g. with a file shank. Place the holes at intervals of approx. 0.5 m, with the outermost holes drilled approx. 10 cm from the ends of the guide.
The distance between the guides at the top will be determined by the hooks of the cassette and the lower ends must be attached to this dimension.
First, using a spirit level, we set one guide and screw it in the lower hole, then the second - at a distance exactly corresponding to the upper spacing. Screwing the guides will facilitate the use of carpentry clamps, which will stabilize them during drilling.
In the same way, the guides are mounted on the external wall, except that it is much more difficult to precisely drill holes in the wall for their fastening. The heterogeneity of the substrate means that the drill often leaves the designated place, which makes it impossible to embed them properly.
The use of a template made of thick sheet metal or a rectangular steel profile with appropriately located holes will help in making holes precisely.
After setting and clamping the template, it will serve as a guide for the drill, preventing it from deviating from the drilling line. After mounting the guides, the screw holes are masked with decorative plugs.
Assembly of external roller shutters on facade windows - step 9. Winding the armor on the shaft
After mounting the cassette and guides, we can proceed to installing the roller shutter curtain. It is attached to the shaft with tape catches, which are inserted into the last slat of the armor.
It's easiest to do it with two people - one holds the shutter's armor, the other directs the catches to the shaft. Then we wind the roller blind onto the shaft and insert its edges into the slots of the guides.
The armor should move smoothly over the entire height without jamming. If it is equipped with locking hooks (protect against lifting from the outside), cutouts for securing pins will be necessary inside this gap.
Oval holes are obtained by drilling with a thin milling mandrel or sawing the joint between two closely drilled holes. We also need to embed lift limiters in the lower segment of the curtain - without them, the rolled roller blind will fall out of the guides and wind up completely on the cassette shaft.
After installing the tape or control cable or connecting the power cord, the cassette can be closed with a cover screwed to its side walls with sheet metal screws.
Installation of external roller shutters on facade windows - step 10. Mosquito net installation
The mosquito net is placed in a cassette on a self-winding shaft, and its side mounting is possible thanks to double grooves in the guides. The mesh cover is wound onto the shaft in the cassette (if it has not been wound during factory assembly) and, after inserting it into the slots of the guides, unfolded to its full height to rest on the bottom brush seal.
Paying attention to the horizontal setting of the strip, mark its position in this position from the inside, which will be used to attach the catches at the appropriate height inside the guides. The catches are attached with sheet metal screws after prior drilling of holes in the marked places. The unfolded mosquito net should hold firmly to the catches - it cannot unhook when gently moving the strip - and when rolling up and unrolling it should slide smoothly in the guide, without jams.
The mosquito net can be used regardless of the position of the main blind. Most often, we roll it out when the blind is raised or when it is in the ventilation position (with the slats spread apart).
Assembly of external roller shutters on the facade windows - step 11. Mounting the mosquito net guide
A string or winding tape must be inserted into the hole going inside the house after hooking it to the shaft. If we use a tape for control, we first introduce a plastic pipe into the hole, e.g. A tube that is too loose should be glued in so that it does not move when rolling up or unrolling the blind.
When controlling the string, insert an elastic guide into the hole, the length of which is adjusted to the length of the hole (the excess is trimmed with pliers). Screw the tape and cord guide to the door frame or to the wall surface with the use of wall plugs. To pull the strings, we will use a stiff wire inserted through the guide from the inside of the house. In the cassette, we will connect it with a tape or string, which will allow you to thread them inside. With the roller shutter lowered, we set the length of the rods by adjusting them to the place where the winder is attached.
Installation of external roller shutters on façade windows - step 12. Mounting the roller
Manual lifting and lowering of the roller shutter requires the installation of a roller with a tape or a cord. When you pull them, the blind will go up and down.
With heavy covers, a crank-operated mechanism is more convenient. The rolling cassette is most often attached to the window frame, in the case of facade roller shutters - on the inside of the wall. Its position is adjusted to the convenience of controlling the roller blind, while the roller itself can be mounted low - if you pull directly on the cord or string.
Connecting the retractor to the ties requires opening its housing. Be careful not to cause the spring to unwind - hold the spool firmly with your hand, and release the lock only after winding the line or tape.
The cable, wound on the shaft of the cassette and threaded through the eyelet in the frame or wall, passes through the guide, which maintains the direction of its winding and unwinding. It is best if the guide and the retractor are placed in one plane. This will allow you to tilt the roller, which will make it easier to adjust the roller blind, as well as mount it, for example, on the side of the reveal, not on the window frame.
Installation of external roller shutters on facade windows - step 13. Equipping the roller shutter with a drive
Automatic control of the roller shutter will significantly improve its operation, especially if it is large and heavy. We need to take care of the power supply and adjust the way the shield is activated.
Most often, the roller shutter is operated with a remote control, so only power cables need to be connected to it.
The scope of necessary electrical installation works is related to the location of the roller shutter connection points to the existing installation (distribution boxes, sockets).
We should ensure the possibility of independent disconnection of the power supply and protect the installation against overload.
If the electrical system is designed for manual activation, we must insert a roller shutter lowering/raising switch into the power circuit, e.g. in a wall box near the window.
Cezary JankowskiIn the opening photo: The roller shutter must be installed in such a way that the inspection cover can be easily accessed. (photo by Fotolia)


